VSCode 环境配置
1. 前置工作
远程服务器默认已经安装 Python/C++ 运行环境,对于 Python 开发推荐使用 Anaconda 进行 Python 环境管理,假设已安装 Anaconda;本地服务器已安装 VSCode IDE,网络与远程服务器互通
2. 远程 SSH 插件安装与配置
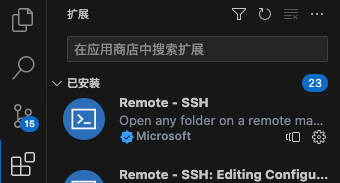
在 VSCode 扩展中安装 Remote-SSH
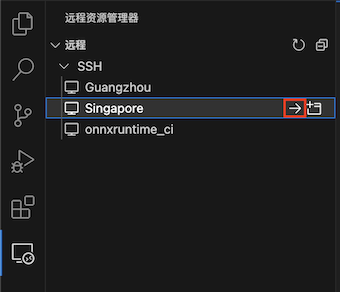
安装后会新增一个远程资源管理器,单击后左侧弹出远程目录,点击“设置”图标,命令窗口弹出配置选项,选择第一个 /Users/zhangsibo/.ssh/config
该配置文件格式如下,其中 Host 是自己给服务器起的名字,HostName 是服务器 IP 地址,User 是登陆服务所使用的用户名
1
2
3
4
5
6
7
8
9
10
11
Host Guangzhou
    HostName 124.71.215.192
    User root

Host Singapore
    HostName 119.8.160.205
    User root

Host onnxruntime_ci
    HostName 119.8.187.17
    User root
配置后远程资源管理器会显示服务列表,点击后面的箭头,在命令窗口输入密码即可连接到远程服务器,并可以打开远程文件夹
如果不想每次连接远端服务器或打开文件夹都输入密码,可以利用 ssh-keygen 命令在本地生成密钥,并将公钥复制到远端服务器
1
2
3
4
5
6
7
# 在本地执行,查看公钥
cat ~/.ssh/id_rsa.pub

# 在远端执行
vim ~/.ssh/authorized_keys

# 复制公钥后按wq保存退出
3. Python 插件安装与配置
分别在本地和远端服务器安装 Python 和 Jupyter 插件
此时,打开远端服务器的 notebook 脚本后会有选择内核选项,但选择 Python 环境后无法找到 Anaconda 管理的 Python 环境,还需在 Anaconda 中安装相应软件包
分别在 Anaconda 的 base 环境和自建环境进行安装
1
2
3
4
5
6
7
8
9
10
11
# 进入 base 环境
conda activate base

# 安装 nb_conda_kernel
conda install nb_conda_kernels

# 进入自建环境
conda activate my_env

# 安装 ipykernel
conda install ipykernel
安装后重启 VSCode,再次连接远程服务器,打开 notebook 脚本后可以选择 Anaconda 管理的 Python 环境
4. C/C++ 插件安装与配置
在扩展中安装 C/C++ Extension Pack,安装后打开远端项目文件夹,由于代码运行在远端,VSCode 会提示在远端安装相应的扩展,点击安装即可
登陆远端服务器,安装 GDB
1
sudo apt-get install gdb
并在 VSCode 中安装 GDB Debugger 扩展
Debug 配置
1. 配置文件及作用
.vscode/task.json
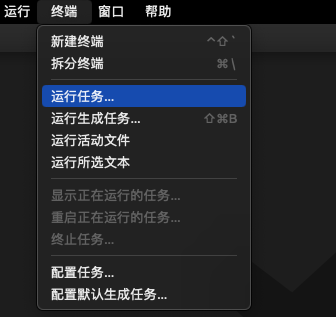
task.json 是任务执行的配置文件,可以用它来代替在终端执行命令行语句,例如 ls -l 或 gcc hello.cc -o hello,本质上对应“终端”工具栏“运行任务”
在 task.json 文件添加下面这段代码,创建三个任务
1
2
3
4
5
6
7
8
9
10
11
12
13
14
15
16
17
18
19
20
21
22
23
24
25
26
27
28
29
30
31
32
33
34
35
36
{
    "version": "2.0.0",
    "tasks": [
        {
            "label": "打印变量",
            "type": "shell",
            "command": "echo Hello",
            "problemMatcher": []
        },
        {
            "label": "目录列表",
            "type": "shell",
            "command": "ls -l",
            "problemMatcher": []
        },
        {
            "type": "cppbuild",
            "label": "编译文件",
            "command": "/usr/bin/gcc",
            "args": [
                "-g",
                "${workspaceFolder}/hello.cc",
                "-o",
                "${workspaceFolder}/hello"
            ],
            "options": {
                "cwd": "/usr/bin"
            },
            "problemMatcher": [
                "$gcc"
            ],
            "group": "build",
            "detail": "compiler: /usr/bin/gcc"
        }
    ]
}
依次点击“终端”、“运行任务”,可以出现上面定义的三个任务,选择后通过 VSCode 内置终端运行,详细配置说明可以参考 Integrate with External Tools via Tasks
.vscode/launch.json
launch.json 是用于运行和调试的配置文件,可以指定语言环境,指定调试类型等等内容,对应着“运行”工具栏
下面是利用 dbg 调试 c 代码的配置样例,其中 preLaunchTask 字段引用了 task.json 定义的任务作为前置编译任务
1
2
3
4
5
6
7
8
9
10
11
12
13
14
15
16
17
18
19
20
21
22
23
24
25
26
{
    "version": "0.2.0",
    "configurations": [
        {
            "name": "编译并调试",         //运行和调试任务的名称,可自定义
            "type": "cppdbg",           //配置类型,默认即可
            "request": "launch",        //launch模式允许我们打断点进行调试,默认即可
            "program": "${workspaceFolder}/hello", //(常用)程序目录,这里相当于在命令行执行"hello"
            "args": [],                 //(常用)程序(main函数)的入口参数
            "stopAtEntry": true,       //在入口处暂停,选true相当于在入口处增加断点
            "cwd": "${workspaceFolder}",//当前的文件目录
            "environment": [],          //添加到程序的环境变量
            "externalConsole": false,   //外部控制台,true在调试时会开启系统控制台窗口,false会使用vscode自带的调试控制台
            "MIMode": "gdb",            //使用gdb进行调试
            "setupCommands": [          //用来设置gdb的参数,默认即可
                {
                    "description": "为 gdb 启用整齐打印",
                    "text": "-enable-pretty-printing",
                    "ignoreFailures": true
                }
            ],
            "preLaunchTask": "编译文件",       //(常用)运行和调试前要执行的task(编译)任务,任务名要和task.json里的"label"对应
            "miDebuggerPath": "/usr/bin/gdb"  //debug调试工具的路径,这里使用gdb所在的路径
        }
    ]
}
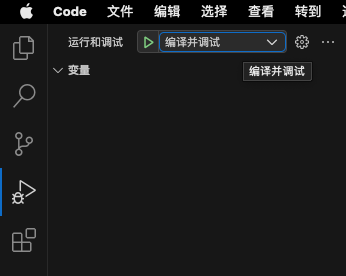
配置后,点击“运行”工具栏,在左侧目录中可以找到定义好的“编译并调试”,详细配置说明可以参考 Debugging 和 Configure C/C++ debugging
.vscode/c_cpp_properties.json
c_cpp_properties.json 主要用来设置包含头文件的路径,设置 C/C++ 支持的版本号等等,在命令窗口搜索 C/C++ 并选择“编辑配置(Json)”即可生成 c_cpp_properties.json 文件
典型配置如下,详细配置可以参考 c_cpp_properties.json reference
1
2
3
4
5
6
7
8
9
10
11
12
13
14
15
16
{
    "configurations": [
        {
            "name": "Linux",                 //配置名称,默认为系统名,可以自行更改
            "includePath": [                 //(常用)运行项目包含.h头文件的目录,
                "${workspaceFolder}/**"         //此处会匹配工作文件下的所有文件
            ],                               //添加"compilerPath"后,系统include路径可不写明
            "defines": [],                 //(常用)定义一些需要的变量,等价于在编译时写"-D变量"
            "compilerPath": "/usr/bin/gcc",     //编译器的路径
            "cStandard": "gnu17",               //C标准的版本
            "cppStandard": "gnu++14",           //C++标准的版本
            "intelliSenseMode": "gcc-x64"       //IntelliSense的一些配置,默认即可
        }
    ],
    "version": 4
}
注意,
c_cpp_properties.json定义的includePath字段只会影响代码编辑器中的头文件索引,不会影响程序执行,程序执行时动态链接库路径由launch.json文件中environment字段定义
.env
.env 用于定义 VSCode 中 Python 运行环境的环境变量,典型定义方式为 environment_variable=value,下面给出 Python 路径的典型示例
1
2
# 将下下面路径追加到 python 搜索路径里
PYTHONPATH=/root/Projects/onnxruntime/build/Linux/RelWithDebInfo
详细配置可以参考 Environment variables
预置变量
前面配置文件中出现的 ${workspaceFolder} 是 VSCode 预置变量,表示 VSCode 的工作路径,除此之外,还预置了其它变量
1
2
3
4
5
6
7
8
9
10
11
12
13
14
15
16
17
18
${userHome} - the path of the user's home folder
${workspaceFolder} - the path of the folder opened in VS Code
${workspaceFolderBasename} - the name of the folder opened in VS Code without any slashes (/)
${file} - the current opened file
${fileWorkspaceFolder} - the current opened file's workspace folder
${relativeFile} - the current opened file relative to workspaceFolder
${relativeFileDirname} - the current opened file's dirname relative to workspaceFolder
${fileBasename} - the current opened file's basename
${fileBasenameNoExtension} - the current opened file's basename with no file extension
${fileExtname} - the current opened file's extension
${fileDirname} - the current opened file's folder path
${fileDirnameBasename} - the current opened file's folder name
${cwd} - the task runner's current working directory upon the startup of VS Code
${lineNumber} - the current selected line number in the active file
${selectedText} - the current selected text in the active file
${execPath} - the path to the running VS Code executable
${defaultBuildTask} - the name of the default build task
${pathSeparator} - the character used by the operating system to separate components in file paths
详细配置可以参考 Variables Reference
2. C/C++ Debug 配置
以调试 ONNX Runtime C++ 项目为例,配置文件如下
1
2
3
4
5
6
7
8
9
10
11
12
13
14
15
16
17
18
19
20
21
22
23
24
25
26
27
28
29
30
31
// .vscode/task.json
{
    "version": "2.0.0",
    "tasks": [
        {
            "type": "cppbuild",
            "label": "编译文件",
            "command": "/usr/bin/g++",
            "args": [
                "-g",
                "-O0",
                "${workspaceFolder}/sess_run1.cc",
                "-I/root/Projects/onnxruntime/include/onnxruntime",
                "-L/root/Projects/onnxruntime/build/Linux/RelWithDebInfo",
                "-lonnxruntime",
                "-o",
                "${workspaceFolder}/sess_run"
            ],
            "options": {
                "cwd": "/usr/bin"
            },
            "problemMatcher": [
                "$gcc"
            ],
            "group": "build",
            "detail": "compiler: /usr/bin/gcc"
        }
    ]
}
// 等价于在命令行执行:
// g++ sess_run1.cc -g -O0 -I/root/Projects/onnxruntime/include/onnxruntime -L/root/Projects/onnxruntime/build/Linux/RelWithDebInfo -lonnxruntime -o sess_run
1
2
3
4
5
6
7
8
9
10
11
12
13
14
15
16
17
18
19
20
21
22
23
24
25
26
27
28
29
30
31
32
33
// .vscode/launch.json
{
    "version": "0.2.0",
    "configurations": [
        {
            "name": "编译并调试",                         //运行和调试任务的名称,可自定义
            "type": "cppdbg",                           //配置类型,默认即可
            "request": "launch",                        //launch模式允许我们打断点进行调试,默认即可
            "program": "${workspaceFolder}/sess_run",   //(常用)程序目录,这里相当于在命令行执行"hello"
            "args": ["models/debug.onnx"],              //(常用)程序(main函数)的入口参数
            "stopAtEntry": true,                        //在入口处暂停,选true相当于在入口处增加断点
            "cwd": "${workspaceFolder}",                //当前的文件目录
            "environment": [                            //添加到程序的环境变量
                {
                    "name": "LD_LIBRARY_PATH",
                    "value": "/root/Projects/onnxruntime/build/Linux/RelWithDebInfo:/usr/local/Ascend/ascend-toolkit/latest/x86_64-linux/lib64"
                }
            ],
            "externalConsole": false,                   //外部控制台,true在调试时会开启系统控制台窗口,false会使用vscode自带的调试控制台
            "MIMode": "gdb",                            //使用gdb进行调试
            "setupCommands": [                          //用来设置gdb的参数,默认即可
                {
                    "description": "为 gdb 启用整齐打印",
                    "text": "-enable-pretty-printing",
                    "ignoreFailures": true
                }
            ],
            "preLaunchTask": "",              //(常用)运行和调试前要执行的task(编译)任务,任务名要和task.json里的"label"对应
            "miDebuggerPath": "/usr/bin/gdb"  //debug调试工具的路径,这里使用gdb所在的路径
        }
    ]
}
1
2
3
4
5
6
7
8
9
10
11
12
// .vscode/c_cpp_properties.json
{
    "configurations": [
        {
            "name": "Linux",
            "includePath": [
                "/root/Projects/onnxruntime/**"
            ]
        }
    ],
    "version": 4
}
3. Python Debug 配置
若 Debug 场景是以 Python 脚本作为入口,启动后在 C++ 代码中进行调试,此时 Python 只作为启动程序,.env 文件不生效,需要在 .vscode/launch.json 中配置 Python 路径,其它配置与 C++ 相同
1
2
3
4
5
6
7
8
9
10
11
12
13
14
15
16
17
18
19
20
21
22
23
24
25
26
27
28
29
30
31
32
33
34
35
{
    "version": "0.2.0",
    "configurations": [
        {
            "name": "从Python启动",                      //运行和调试任务的名称,可自定义
            "type": "cppdbg",                           //配置类型,默认即可
            "request": "launch",                        //launch模式允许我们打断点进行调试,默认即可
            "program": "/root/anaconda3/envs/onnxruntime/bin/python",   //(常用)程序目录,这里相当于在命令行执行"hello"
            "args": ["sess_run.py"],              //(常用)程序(main函数)的入口参数
            "stopAtEntry": false,                        //在入口处暂停,选true相当于在入口处增加断点
            "cwd": "${workspaceFolder}",                //当前的文件目录
            "environment": [                            //添加到程序的环境变量
                {
                    "name": "LD_LIBRARY_PATH",
                    "value": "/root/Projects/onnxruntime/build/Linux/RelWithDebInfo:/usr/local/Ascend/ascend-toolkit/latest/x86_64-linux/lib64"
                },
                {
                    "name": "PYTHONPATH",
                    "value": "/root/Projects/onnxruntime/build/Linux/RelWithDebInfo"
                }
            ],
            "externalConsole": false,                   //外部控制台,true在调试时会开启系统控制台窗口,false会使用vscode自带的调试控制台
            "MIMode": "gdb",                            //使用gdb进行调试
            "setupCommands": [                          //用来设置gdb的参数,默认即可
                {
                    "description": "为 gdb 启用整齐打印",
                    "text": "-enable-pretty-printing",
                    "ignoreFailures": true
                }
            ],
            "preLaunchTask": "",              //(常用)运行和调试前要执行的task(编译)任务,任务名要和task.json里的"label"对应
            "miDebuggerPath": "/usr/bin/gdb"  //debug调试工具的路径,这里使用gdb所在的路径
        }
    ]
}
若调试场景为纯 Python 代码,则配置文件如下,此时无法在 C++ 代码中打断点调试
1
2
// .env
PYTHONPATH=/root/Projects/onnxruntime/build/Linux/RelWithDebInfo
1
2
3
4
5
6
7
8
9
10
11
12
13
14
// .vscode/launch.json
{
    "version": "0.2.0",
    "configurations": [
        {
            "name": "Python: 当前文件",
            "type": "python",
            "request": "launch",
            "program": "${file}",
            "console": "integratedTerminal",
            "justMyCode": false
        }
    ]
}


